Visualizzazione post con etichetta udk. Mostra tutti i post

25.1.11

[Tutorial] Ase Exporter for Blender to UDK

Autore: kat

ASE Import and export scripts for Blender 2.5 series. Both import and export scripts should be placed in Blenders "scripts/io" folder. If there are any other ASE scripts present it's best to remove or rename them as Blender 2.5 tends to like scripts following a specific naming convention.

Download

Download ASE export for 2.56

Download ASE io scripts for Blender 2.54 (inc, 2.55beta)


Installation

Make sure you are using an officially released version of Blender (available from Blender.orgbefore using these scripts; in development subtrees of the application tend to break scripts so check before using.
Both scripts need to be placed in the following location;
scripts\io\
For Windows Vista/Win7 users Blender's scripts folder is typically located in;
C:\Users\[profile]\AppData\Roaming\Blender Foundation\Blender 2.53\scripts\io\
Windows XP users should look in;
C:\Documents and Settings\[profile]\Application Data\Blender Foundation\Blender 2.53\scripts\io\
Linux and Mac installation will differ depending on OS version used.

Usage

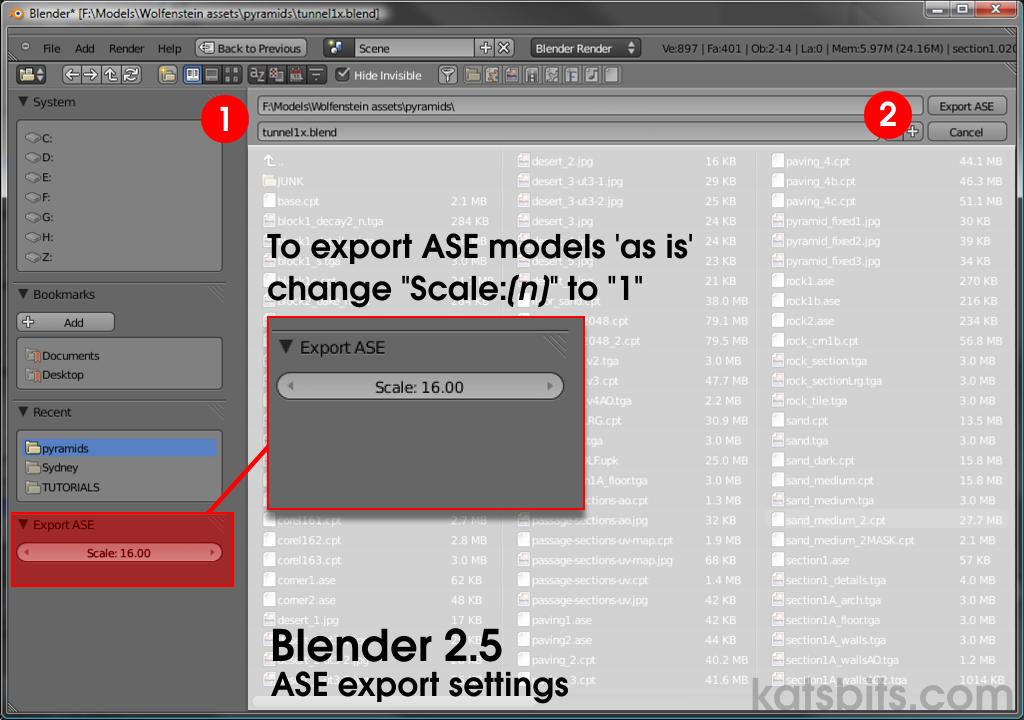
For additional and extensive ASE export details read the ASE export tutorial hereASE Export: As with other scripts, select the object or objects that need to be exported and click "File >> Export >> Ascii Scene Export (ase)". Type a name or select the file to overwrite and then click the "Export ASE" button to export the model. Model scale default is set to "16", this is a multipler so it will scale your object up by sixteen (or "[n]" value input). To export objects 'as is', set the "Scale:[n]" value to "1" ("Scale: 1").
Note: remember that you can export several objects as a single mesh to get a multi sub-object mesh (has several "GEOMOBJECTS" written into the ASE) with multiple materials. Or, an object where sub-objects are joined before export producing a single model with one multi-material. Additionally, it's currently not possible to export 'blank' meshes, i.e. all meshes need a material, texture and UVW map else the process reads them as being incomplete, halting the export procedure.
Using the Blender 2.5 export script
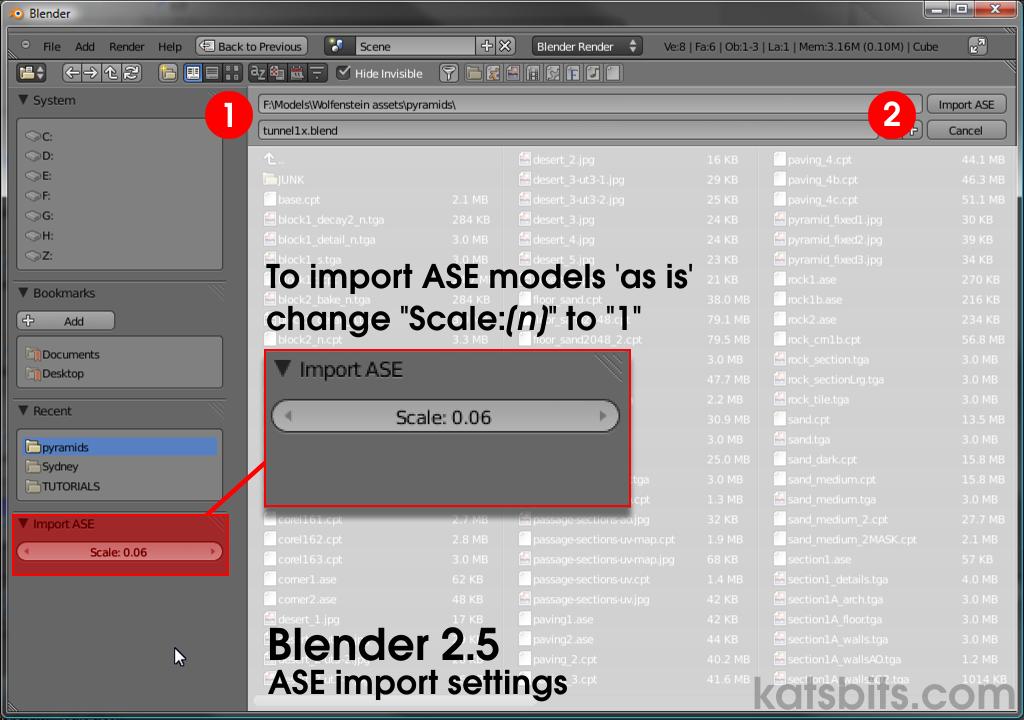
ASE Import: From the "File" menu select "File >> Import >> Ascii Scene Export (ase)", then select the file to be imported into Blender. To import a model 'as is' without altering the size of the object/s, change the "Import ASE" "Scale:[n]" value to "1" (default currently "0.06").
Importing ASE models into Blender 2.5

Problems and Errors

There are a couple of basic script related issues you need to be aware of when exporting or importing meshes and models;
  1. The script is currently written to halt on finding  'blank' meshes, i.e. a mesh object without materials, textures or UVW maps will stop the process.
  2. If Blender complains about 'periods', check the file names to make sure they're as follows as anything else may return a script error in the Python console.
    • export_ase.py
    • import_ase.py
  3. Similarly, if the script doesn't appear in the File >> Import/Export menus check file name conforms to the above.

Misc & UT/UDK editing

Exporting ASE models for UDK/UT editing has some issues. For more information read this topic.

[Tutorial] UDK Speedtree

Autore: SoulEater

In questo tutorial vi spiegherò come creare un albero in: SpeedTree, compilarlo ed importarlo correttamente in UDK.

Abbiate molta pazeienza perché non sarà molto breve questo tutorial .

Passo 1 (aprire SpeedTree e creare un albero):
  • Start -> Tutti i programmi -> Unreal Development Kit -> UDK-2011-01 -> Tools -> SpeedTree 5.0 Modeler
  • File -> New
Ora in basso a destra dovreste avere questa schermata:


  • Selezionata la "sfera Tree" con il tasto sinistro del mouse
  • Taso destro del mouse -> Add to selected -> Trunks -> Variable
A questo punto vi comparirà il tronco nel "Navigator" e nel "Generation" vi comparirà una nuova "sfera" chiamata: "Trunks".

  • Selezionate la "sfera Trunks"
  • Tasto destro del mouse -> Add to selected -> Branches -> Level 1 Starndard RT
A questo punto vi comparirà una nel "Generation" una nuova "sfera" chiamata: "Livel 1".

  • Selezionata la "sfera Level 1"
  • Tasto deostro del mouse -> Add to selected -> Leaves -> Wide
Ora nel "Navigator" avrete un albero cosi:


Ora dobbiamo applicarci le texture in modo tale da aver un vero e proprio albero.

23.1.11

[Download] Unreal Development Kit Gen 2011


Upgrade Notes:

[Guida] Distruggere una parete con UDK

Autore: SoulEater

Se è la prima volta che usate UDK, seguite prima questo tutorial: Piccola guida per inziare con UDK
  • Apriamo il: Content Browser
  • View -> Browser Windows -> Content Browser
  • A sinistra del nostro: Content Browser sotto la: Shared Collections selezioniamo: UDK Building Meshes
  • Clicchaimo due volte sulla parete (guardate lo screen):


  • Ora cliccate su: Tool -> Fracture tool
  • Impostiamo: Num Chunks a: 150
  • Ora cliccate su: Generate
  • Ah questo punto il nostro muro si "riempirà" di linee colorate, voi non dovete far altro che selezionare le varie parti che non volete che si frantumano


  • Ora sempre nel: Fraacture Tool, spuntiamo la casella: Support Chunk e infine clicchiamo su: Silce e quando ci chiederà di salvare, salviamolo cliccando su: Ok
Schermata Fracturee Tool:


  • Ora possiamo chiudere il: Fracture Tool e la schermata dve ce la nostra parete.
Ora potete notare che è stata creata una nuova parete indentica a quella originale ma con il nome che ci abbiamo dati noi (se lo avete modificato durante il: Silce)

  • Clicchiamo su questa nuova parate con il: Tasto destro del mouse
  • Clccchiamo su: Edit Using Static Mesh Editor...
  • Scrolliamo fin ad arrivare alla fine dello scroll e deseleziniamo le voci: UseSimple Box Collision & Use Simple Line Collision 
  • Riclicchiamo con il tasto destro sulla nostra nuova parete e clicchiamo su: Save
  • Ora potete chiudere tutto e trascinare dal: Content Browser la vostra nuova parete nel gioco
  • Avviate il gioco e sparetici contro :P 

[Tutorial] Piccola guida per inziare con UDK

Autore: SoulEater


Ho deciso di fare questa piccola guida per iniziare con UDK, sono cose basiliari quindi nulla di speciale.

Passo 1 
(Facoltativo)
:

  • Aprite: "UDK Editor"
Ora vi compirà una finistra con un solo "Viewport" con un cubo vuoto, voi dovete cliccare questo pulsantino:


Cosi si visualizzeranno quattro "ViewPort" che vi saranno molto comodi per la creazioni delle mappe.

Passo 2 (Creare il "pavimento"):

Ora dobbiamo creare il nostro primo "pavimento" partendo dal cubo vuoto.

  • Selezioniamo il cubo col tasto sinistro del mouse
  • Ora clicchiamo col tasto destro sull'icona del cubo (guardate l'immagine)


  • Impostiamo l'asse "X" su: 2500.000000
  • Impostiamo l'ass "Y" su: 2500.000000
  • Ora riempiamo il cubo cliccando con il tasto sinistro del mouse su: (guardate l'immagine)


Passo 3 (Aggiungere il "Player Start"):

  • Cliccate con il tasto destro del mouse sul nostro "pavimento"
  • Add Actor -> Add Player Start
Passo 4 (Illuminazione):

  • Cliccate con il tasto destro del mouse sul nostro "pavimento"
  • Add Actor -> Add Light (Point)
Rifacciamo questa operazione per due volte, cosi nel nostro "Viewport" ci saranno due lamapdine.

Ora se avviate il gioco si vedrà tutto buio, niente paura c'è la solzuone !

  • Cliccate con il tasto destro del mouse su una delle lampadine
  • Set Wath This Light Effects -> Affecting Both Dynamic and Static Objetcd
Ora se avviate vederete tutto illuminato. Perché abbiamo inserito due lampadine e non una ? bhe togliete la lampadina che non abbiamo modificato cosi potrete vedere una piccola ma importante differenza.

Passo 5 (Aggiungere una Textura al "pavimento"):

Sopra all'editor dobbiamo cliccare su:

  • View -> Browser Windows -> Content Browser
  • Nel cerca inserire: Material
  • Scrolliamo fin quando non troviamo una buona textura per il terreno, io ho scelto: M_ASC_Floor_BSP_Tile01
  • Trascinate la textura sul terreno per applicarla
Passo 6 (Aggiungere il cielo):

Sopra all'editor dobbiamo cliccare su:

  • View -> Browser Windows -> Content Browser
  • Nel cerca inserire: sky
  • Scrolliamo fin quando non troviamo il nostro cielo che più preferiamo. Attenzione: il cielo deve essere un:StaticMesh per applicarlo.
  • Trascinate il nostro cielo nello spazio vuoto e positiamolo e ridimensioniamo in modo tale da poter avere un cielo "realistico"
Passo 7 (Avviare il gioco):

Per avviare il gioco basta cliccare sulla freccia vedere (guardate l'immaigne)


Fine. Ora vi ritroverete una scena simile a questa:


18.1.11

[Tutorial] Add External Video In UDK - Aggiungere Video

Add External Video In UDK - Aggiungere Video
Oggi vi metto a disposizione un mio tutorial per come aggiungere un video esterno in UDK e anche come importarlo.
Import external video and add it in the level of UDK...

Tutorial:

Autore: Gears Corporation
Non ridistribuibile su altri siti/forum senza chiedere l'autorizzazione all'autore...

[Tutorial] Create .exe with UDK - Update - New Version

Create .exe with UDK - Update - New Version Of Unreal Frontend
Con questo tutorial vedremo come creare il .exe di un livello fatto con UDK, però con la versione aggiornata di Frontend, non più con la versione vecchia.
With this tutorial we will create a .exe of our level maked in UDK with the new version of Unreal Frontend.

Tutorial:


Autore: Gears Corporation
Non ridistribuibile su altri siti/forum senza chiedere l'autorizzazione all'autore...

23.12.10

[UDK - Download] Download free Unreal Development Kit - Dec 2010

Download free Unreal Development Kit - December Beta 2010


News from Epic Games – December 2010 UDK Beta Released
December 16, 2010 – Epic Games, Inc. has released the December 2010 UDK Beta, the latest version of the Unreal Development Kit (UDK), the free edition of Unreal Engine 3 that provides access to the award-winning toolset used in blockbuster video games, 3D visualizations, digital films and more.
Epic is committed to providing the UDK community with regular software releases at no charge, and the latest beta is available now at www.udk.com/download.
This month, we are thrilled to ship a new and improved UDK, now with iOS support. Keep reading for more details, and check out www.udk.com to see examples of what you can do with these new tools.
iPhone

Epic is committed to providing the UDK community with regular software releases at no charge, and the latest beta is available now at www.udk.com/download.
NEW! iOS Support 
Brand new features and content that users will immediately notice are:

5.12.10

[UDK - Download] Download free Unreal Development Kit - Nov 2010


Upgrade Notes
UDK now ships with an additional map, plus many improvements to the Unreal Editor have been made.
UDKGame
  • The new time of day map (as seen in the new trailer mentioned above) now ships with UDKGame example game content.
Unreal Editor
  • UDK’s new welcome screen improves functionality.
WelcomeScreen.png
  • New Absolute Translation mode moves the widget to the mouse location.  This is the new default translation scheme.
  • A new widget has been added to combine common translation and rotation operations.  This handy tool for level designers is in the prototype phase and is therefore off by default.
  
  • Several updates to the Rotation Widget have been made. These can be enabled but are off by default.
  • Box selection is now supported in perspective viewports.
  • New version of the MemLeakCheckDiffer tool can be found in \UnrealEngine3\Binaries\MemLeakCheckDiffer.exe.
  • New HeadTracking track for eye/head tracking of skeletal mesh actors in Matinee has been added.
  • When saving a persistent level to a new name, you can now rename all sub-levels as well, specifying a new prefix if necessary.
  • New “move/rename” source control command has been added.
  • Copying multiple soundcues to another package will now default the “Name Suffix” checkbox to false.
  • New 'Highlight Objects Under Cursor' feature to editor viewports (actors and BSP surfaces) has been added.
  • The AnimSet editor now allows you to search an AnimSet for AnimSequence names.
  • The texture viewer now has a checkerboard for better viewing of transparent textures.
TextureProps_BeforeAfter.png
  • The option to turn on/off horizontal grid lines between properties in PropertyWindows is now available.
  • Double-clicking on sequence start/finished actions now takes you to the parent sequence.
  • Users should no longer have to triangulate meshes before exporting to FBX.
  • A command line option for rebuilding and checking in levels is now available.
  • The automatic build and submit tool no longer needs every streaming level checked out in order to proceed.http://udn.epicgames.com/Three/AutomatedMapBuild.html
Miscellaneous Enhancements
  • Sockets in the socket manager are now in alphabetical order.
  • The following Kismet shortcuts have been updated:
    • C + left-mouse-click: Add console event.
    • Removed the "add comment" shortcut ("C").
  • The Toggle Horizontal Dividers setting will now be remembered across sessions.
  • “NO COLLISION” warnings will again be displayed for static meshes and fractured static meshes on their thumbnail icons.
  • The nFringe script debugging is now supported with 64-bit UE3 executables.
    • You will need the latest version of nFringe (version nFringeSetup-pre-1.1.34.193 or later).
  • The FBX SDK has been upgraded to FBX SDK 2011.3.1.
  • With this upgrade meshes no longer need to be triangulated before importing to UE3.

8.11.10

[UDK - Download] Download free Unreal Development Kit - Oct 2010

[UDK - Download] Explosive Barrels for udk

Quello che vedrete sotto è il barile esplosivo che ho fatto per Unreal Development Kit.
Praticamente questo barile era gia nel Content Browser, ma non era esplosivo, gli si è stata messa questa cosa del esplosione che se gli si spara il barile esplode in mille pezzi...
Barrels Explosion in Unreal Development Kit

Screen:

Video: Click here!
Download: Barile esplosio per UDK
Password: up_by_cole

Non ridistribuibile su altri siti/forum senza chiedere l'autorizzazione all'autore...